
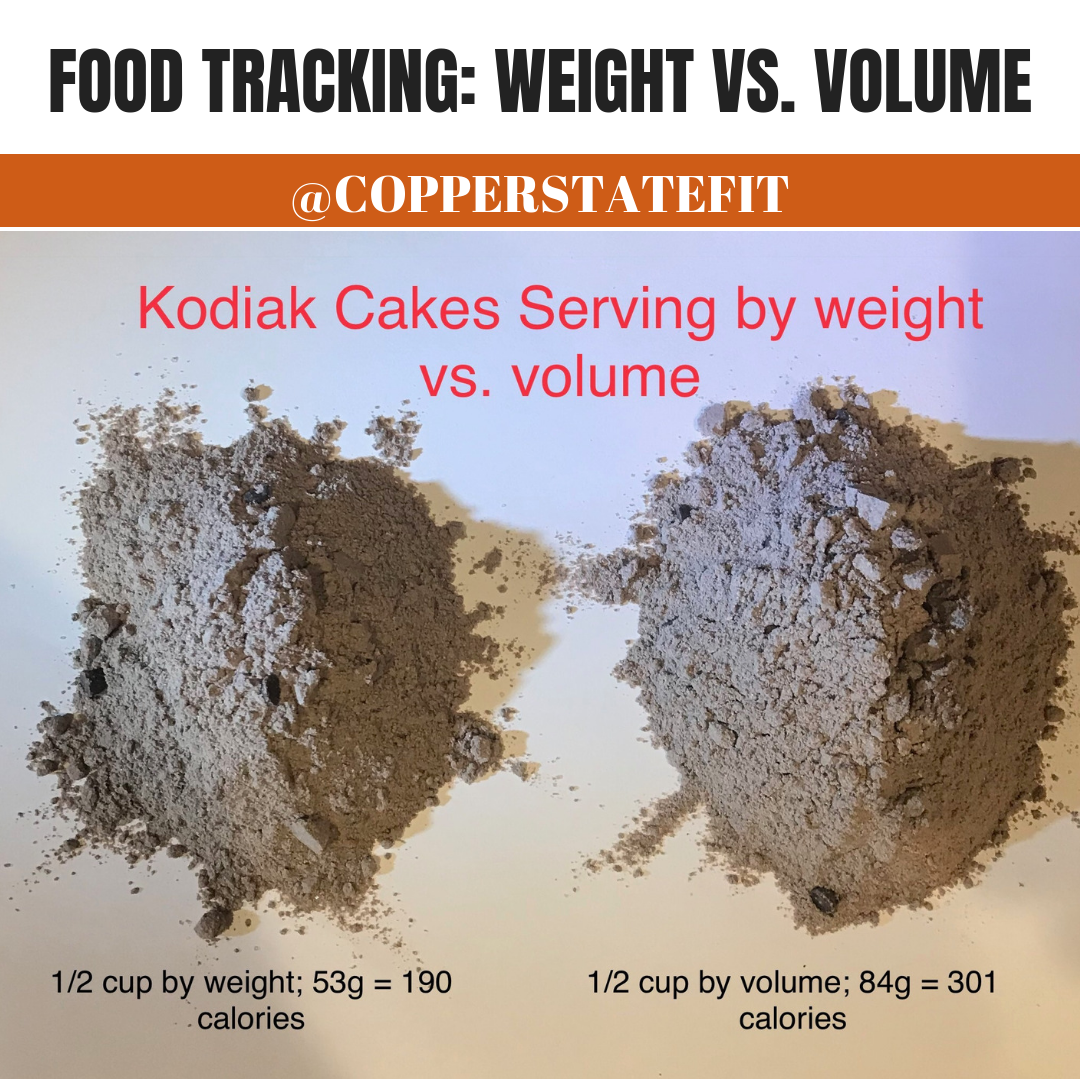
 It doesn’t LOOK like much, but there’s a 111 calorie difference between these two servings of Kodiak Cakes. Make this common mistake over 3-4 meals/ day and THAT could be sabotaging your results!
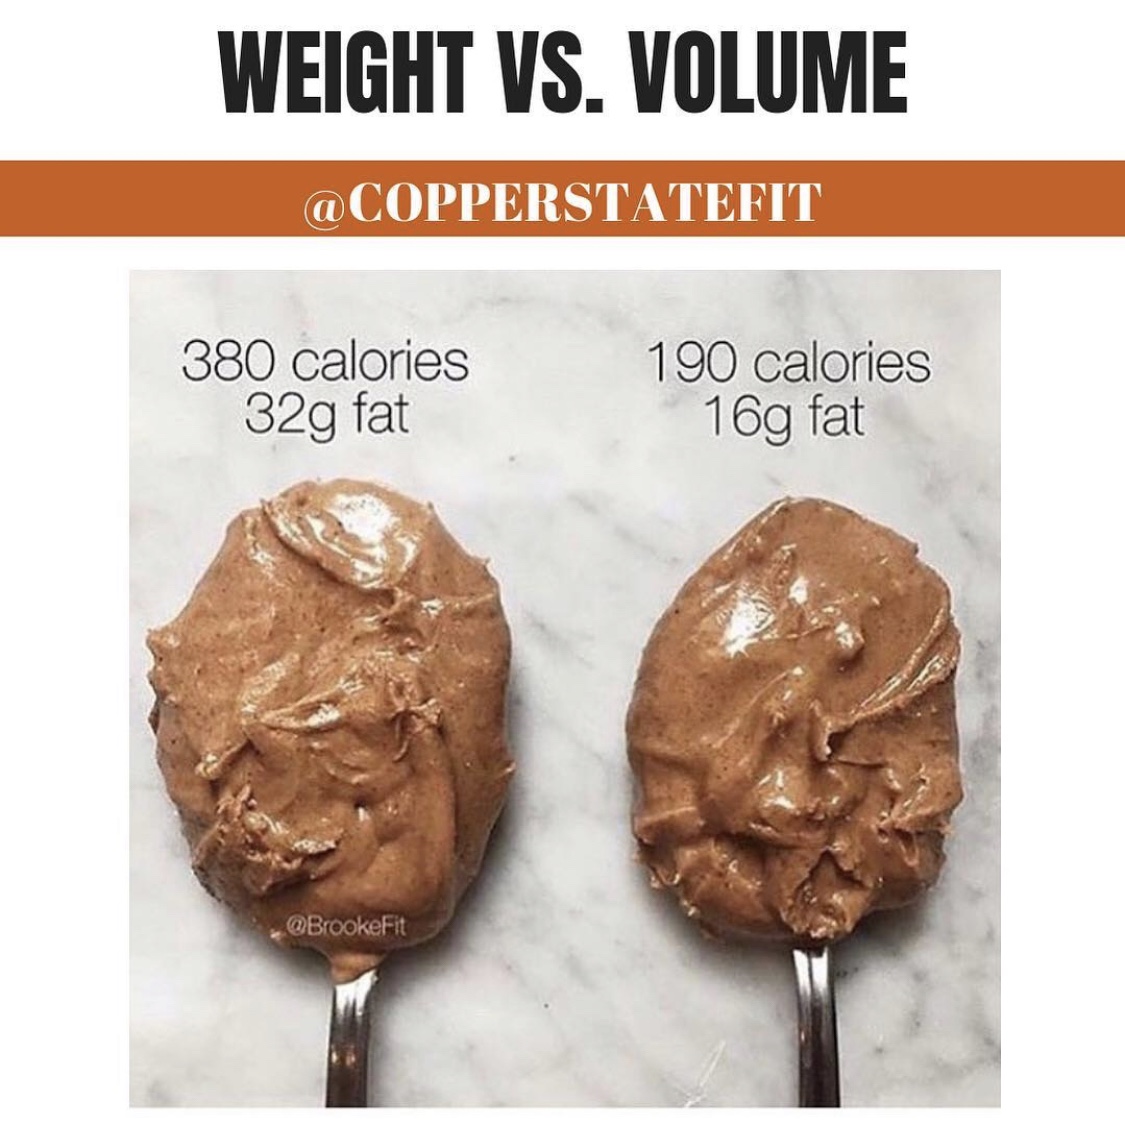
When you are tracking calories and/ or macros, it’s important that you TRACK THEM ACCURATELY!
It’s also important to understand the difference between tracking by VOLUME and by WEIGHT.
🧠 UNDERSTANDING WEIGHT VS VOLUME
- VOLUME
- Measuring an item by how much space it takes up.
- To measure by volume, you would use cups and/ or spoons (ex: ½ cup, 2 tbsp, etc.)
- WEIGHT
- Measuring an item’s mass, or the weight of the food item (ex: grams, ounces, fluid ounces)
- If you have ever opened a bag of chips and noticed that half the bag is air, this is because the product was packaged by WEIGHT (using a scale), not VOLUME (filled up to the top)
💡 We Advocate Tracking Foods by Weight for Several Reasons:
- Foods do not fit evenly into cups/ spoons etc. As a result, you may end up eating LESS than you need due to inaccurate measurement.
- It’s very easy to OVER serve when using cups/ spoons.
- Do you pack the cup?
- Should it be loosely packed?
- Should it be level or a heaping spoon? I mean, let’s be honest… when you use a spoon to serve yourself some peanut butter, who’s really serving just ONE?! 😜
- Last, but not least, who wants to clean those things over and over again. Just use the scale, you’ll thank us later.
✅ Here’s How To Track Your Food & Liquids by Weight:
- Weigh the food and/ or liquid with your food scale (using: grams, ounces, fluid ounces or milliliters)
- Log it in your food tracking app
- Adjust the SERVING SIZE to the unit of weight used on your food scale (grams, ounces, fluid ounces, milliliters)
- Adjust the NUMBER OF SERVINGS to match the weight on the scale
- Ex: Banana, adjust the serving size to oz or g. Then, adjust the number of servings to the amount equal to the weight of the banana.
- Follow this for each item you eat at each meal. As you do this, your app counts and keeps track of the calories and macronutrients you have consumed.
- Solids will be weighed using grams (g) and ounces (oz), while liquids will be weighed using milliliters (ml) or fluid ounces (fl oz).
💡 TIPS FOR WEIGHING FOOD AND LIQUIDS
When it comes to tracking/ weighing whole foods, you may feel overwhelmed by the vast number of choices in the database. You may begin to question your own accuracy with tracking calories and/ or macros.
We have found this fear of making a mistake, or the wrong selection, can lead down a path of eating fewer whole foods and more packaged/ processed foods. Simply because, scanning a bar-code is easier and gives (a false) peace of mind. Since we want to eat (mostly) whole foods, this is quite the opposite of what we intend!
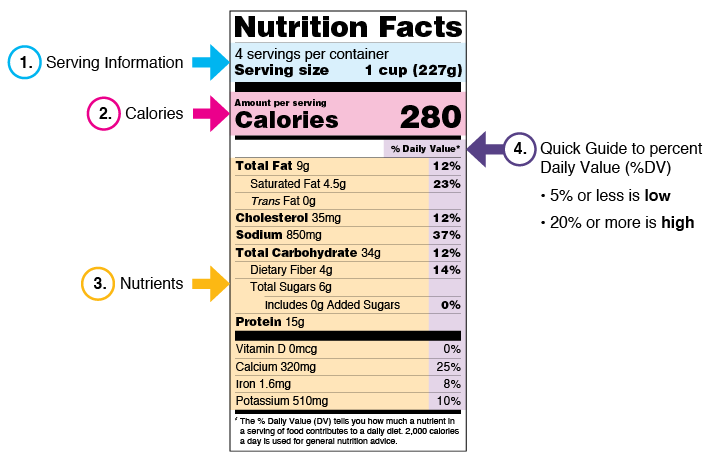
Food labels typically display serving size by weight, which can be found in parentheses, as shown in the sample nutrition label (227g). Though, this isn’t always the case. As with whole foods, they often do not have a food label, which can make logging a little bit tricky.
The good news is, the Copper State FIT Meal Tracker uses the USDA Database as the foundation for our food database. The USDA has tested these foods for calories and macro/ micro nutrient content. Of the nearly 250,000 “whole-food” items, (including virtually all whole-foods in their raw AND cooked versions) the Copper State FIT Meal Tracker has them all! So, when you know how to search, you will often find what you are looking for.
Here are some tips to help improve your Food Logging with the Copper State FIT Meal Tracker:
- GENERIC WHOLE FOODS: This includes foods with similar nutrient content regardless of brand, such as most plain dairy products, produce, meats, poultry, fish, nuts, seeds, oils, fats, etc.
- To narrow your search results and improve nutrition data accuracy, include additional descriptors in your search query
- Ex: Search for “dark meat chicken raw” instead of just “chicken”
- Instead of logging brand-name foods such as “2% Organic Reduced Fat Milk by Organic Valley”, you can simply log “Milk Reduced Fat 2% Milk fat”
- The benefits of this include more portion size options, and more complete nutrient content for each item. This is because name-brand foods often only list the nutrients required on the Nutrition Facts panels.
- If you eat food that is cooked, then ideally, search for and log the “cooked” version of the food item. Doing so will give you the most accurate calories and macronutrient content.
- To narrow your search results and improve nutrition data accuracy, include additional descriptors in your search query
- FRUITS & VEGGIES
- Fresh/ Raw Fruits & Veggies:
- To quickly find fresh/ raw fruits & vegetables, include key terms like “raw” or “fresh” in your search query.
- Ex: Search for “broccoli raw” and it will pull up as the first item at the top of your search.
- Cooked Fruits & Veggies:
- Include the specific cooking method in your search
- Ex: “broccoli boiled” will pull up as the first item at the top of your search.
- 💡 Hint: The USDA does not list “steamed” vegetables. Simply look them up as “cooked”
- Fresh/ Raw Fruits & Veggies:
- DRY vs. WET FOODS: The nutrition data included on the label of packaged foods are given ‘AS IS’. In other words, the weight stated on the label of dry goods like pasta, rice, oats, grains etc. are typically for the DRY/ UNCOOKED product.
- The CSF Meal Tracker database (from the USDA) has a number of “cooked” pasta, rice, oatmeal and grain options. So, choose one of those when needed.
- Add the word “cooked” to bring up cooked foods instead of raw because the cooked weight WILL make a difference in calories and nutrition.
- Be sure to log it the same way you weighed it. If you weighed it cooked, find it in the database by searching for “cooked” otherwise, looking up these food items without this assumes the raw/ dry version
- RAW vs. COOKED MEATS: Food labels, if available, typically list raw weight of fish, poultry and meats. Most meats shrink about 25% with cooking, since they lose a small amount of water and fat. For example, if you started with 4 oz raw ground beef, then the actual cooked weight of the patty is closer to 3 oz.
- The CSF Meal Tracker database (from the USDA) has many raw AND cooked versions of various meats to select.
- Add the word “cooked” to bring up cooked foods instead of raw because the cooked weight WILL make a difference in calories and nutrition.
- Be sure to log it the same way you weighed it. If you weighed it cooked, find it in the database by searching for “cooked, grilled, baked”, etc. Otherwise, looking up these food items without these additional terms is assuming the raw/ dry version
- Just remember, the way you buy it is the way the calories and macros are provided on the label. There are a few exceptions; sometimes bacon will specify that the nutritional data on the label are for the cooked product, so of course you should weigh it cooked.
- Furthermore, when you purchase meat at the store and there is a label on it, that label is for the raw product. So, if you are using the nutritional information from the label provided, you must weigh it raw. Or, you can search for the generic whole-food equivalent and weigh it cooked.
As you can see, when tracking your meals, it’s critical that you log all foods and liquids by WEIGHT, NOT VOLUME! Even small, unintentional, mistakes in logging portion sizes, when repeated over and over, can sabotage your results!
Though it may seem overwhelming, it’s very important that you develop the confidence and skill to track your meals this way. These simple guidelines will vastly improve your accuracy, which could be the difference between you seeing results or not!
We hope this helps!